Let’s set the scene. You’re in the process of designing a new feature for your product. You and your team know how you want it to look and work, but you’re yet to receive any external feedback. You need to validate your design before sending it off for implementation to avoid ending up back at the drawing board—with all the development resources that come with it. That’s where prototype testing comes in handy.
Prototype testing is an essential step in your product research and design process, so you want to be sure you’re doing it right. In this article, we’ll take a closer look at prototype testing and its benefits, as well as how you can create and test prototypes that provide the insights you need to deliver a usable MVP the first time around.
Ready?
What is prototype testing?
Prototype testing consists of creating a design mock-up or a feature prototype and gathering feedback from your target audience on what works and what doesn’t. It helps teams—be it UX teams or product marketing teams—to identify potential issues or validate product decisions.
Prototype testing can be helpful throughout your entire product lifecycle. Read on to find out the benefits of prototype testing, and how you can gather key insights throughout your product development process.
Why prototype testing is important
Prototype testing is important for creating research-informed products. It’s a way to gather insights for your current product and learn how you can modify it to best meet your users’ needs—whether that’s a product walkthrough or added in-product widgets.
Let's take a closer look at the benefits of prototype testing.
Find issues early on
Prototype testing takes place at different stages of the design process. It can be a great indicator of which features work and which don’t.
According to Matthieu De Tarlé, Product Manager at a resource management tool PickYourSkills, this is an unbeatable advantage as “it drastically reduces every risk to engage tech resources on useless features.”
For example, let’s say you’re developing a new social app for business conferences. You want users to be able to quickly add connections, people they meet while at an event. But then, during prototype testing, you realize none of your testers are able to successfully add a connection to their network—they simply can’t find the button.
Prototype testing at different stages of design helps you identify problematic issues and areas of your product that could do with improvement. In our example case, you'll need to improve UI by moving things around to provide a clearer path to adding connections.
Discover potential opportunities
Prototype testing can also help you with product development. You invest a lot of time and energy into creating a product, but it’s easy to dismiss and overlook features that your target audience might love.
The qualitative data you collect from prototype testing—such as questions from participants and insights from open card sorting—can help inspire new features and capabilities. Let’s consider our social app example:
Where do I add any notes I have on this connection?
How do I group people by organization?
I’d have expected XYZ to be here. Where can I find it?
These types of questions and comments from participants are invaluable for finding the best user flow. You can also gather quantitative information from your prototypes with product click maps—where your users’ clicks suggest how they expect your product to work. This can help you ensure your design is intuitive.
If you come up with multiple ideas or different concepts you want to test with your target audience, you can use the Card Sort Template from WRKSHP Tools to prioritize what to work on first.
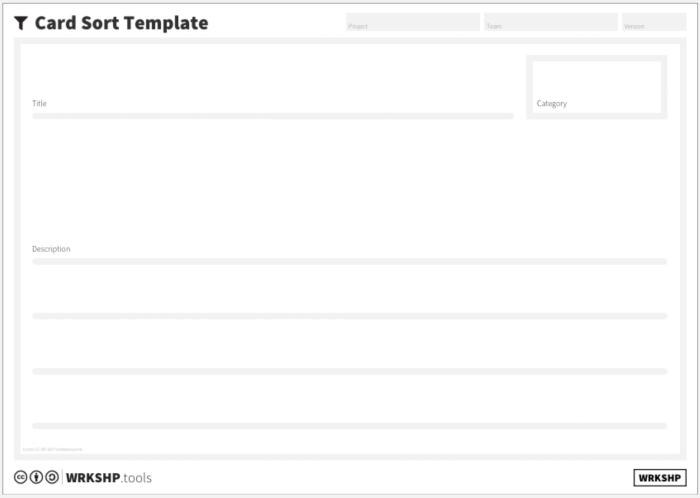
Using this template, briefly describe each of the concepts/ideas and present them as cards to learn your audience’s preferences. You can also use the cards internally with your team and stakeholders.
Convince stakeholders with data-driven insights
Getting everybody on board when it comes to a certain feature can be a daunting task—priorities don’t always align. While your UX designer might be all in on focusing on one area, your marketing manager might not be so convinced.
Prototype testing can be a way to gather quantitative and qualitative feedback—which we’ll touch upon shortly—to guide product development. There’s no better way to back up your team’s direction than with cold, hard facts from the people who will be using your product the most.
How to test your prototypes in 6 steps
Now we know the benefits, let’s take a look at how you can approach your prototype testing process.
1. Know what you’re testing and why
First up is understanding what it is you’re looking to test and discover about your product. Plus, how you plan to distribute and use your findings in the development process.
This helps determine the prototype format that will be of most use to your design direction. These are different methods of prototype testing for different stages of your product:
Product prototype testing is for when you’re in the process of developing a new product (MVP). This could be something completely new, or it could be an additional product you're planning to offer.
Product redesign testing is for gathering insights for a major redesign. You have a product, but you’re looking to make big improvements with a major redesign. For example, it can help inform what changes need to be made to the information architecture to ensure it’s easy to understand and navigate.
Feature prototype testing is for testing new features before they’re put into development. For example, beta testing is a form of feature prototype testing that enables you to get feedback from a specific segment of your users.
In-product experiments testing is for smaller-scale testing of existing products and idea validation through in-app messaging. You’re looking to hone in on a specific capability, and gather as much feedback as possible. For this purpose, you can use the Experiment Canvas, created by the abovementioned WRKSHP Tools. It will help you facilitate the right conversation about the right experiment at the right time.
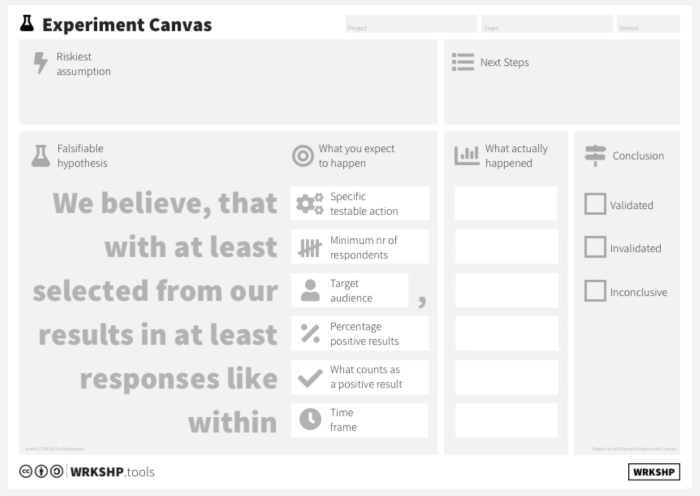
Prototype testing is an iterative process—you want to be continually testing and gathering feedback throughout the design process. You’ll likely be engaging with different prototyping formats throughout the product lifecycle.
Understanding what you’re aiming to discover with each step is key in your prototype testing process. Be clear on what it is you’re looking to do, and develop your prototype testing process by building on this foundation.
Bring prototype testing into your app
Use Chameleon's integration with Figma to test out new designs with your users in-app, and immediately get their feedback, so you can iterate fast.
2. Define the target audience for your test
Next, you want to decide who’s going to be testing your prototype—your test participants. Ideally, you want your test participants to reflect your target group of users.
For example, if your product is yet to launch, you want to look for individuals that fall into your target audience, otherwise known as ICPs (ideal customer profiles). In our example of a business events social app, our ICPs could be freelancers who frequently meet new connections on the go. They’re who the app is designed for, and they’re the best people to turn to for valuable feedback.
Now let’s consider the same example, just this time you’re looking to redesign the connection profile page. Imagine you want to invite existing users to test the prototype—ones that have experienced your product before the changes. They can comment on the improvements, as well as provide insights into what they expected from your feature development—taking your user research to the next level.
3. Create a prototype
The type of prototype you create depends on what stage of testing and development you’re at. There are two main types of prototyping to consider:
Low-fidelity prototypes are used for testing in the very early stages of your product development process. They’re often a basic wireframe or paper prototype that enables you to uncover early-stage insights and feedback. Low-fidelity prototypes can help you with the basics, such as if your layout works or if users can find basic information.
High-fidelity prototypes are used for testing during the final stages of your design process. You should be pretty confident in your design at this point, and your prototype testing should only be uncovering minor usability issues. For example, your high-fidelity prototype should help develop insights into your copy and user flows, as well as any other final stage considerations.
Here’s a visual comparison of low-fidelity and high-fidelity prototypes from ProtoPie that sums up the differences.
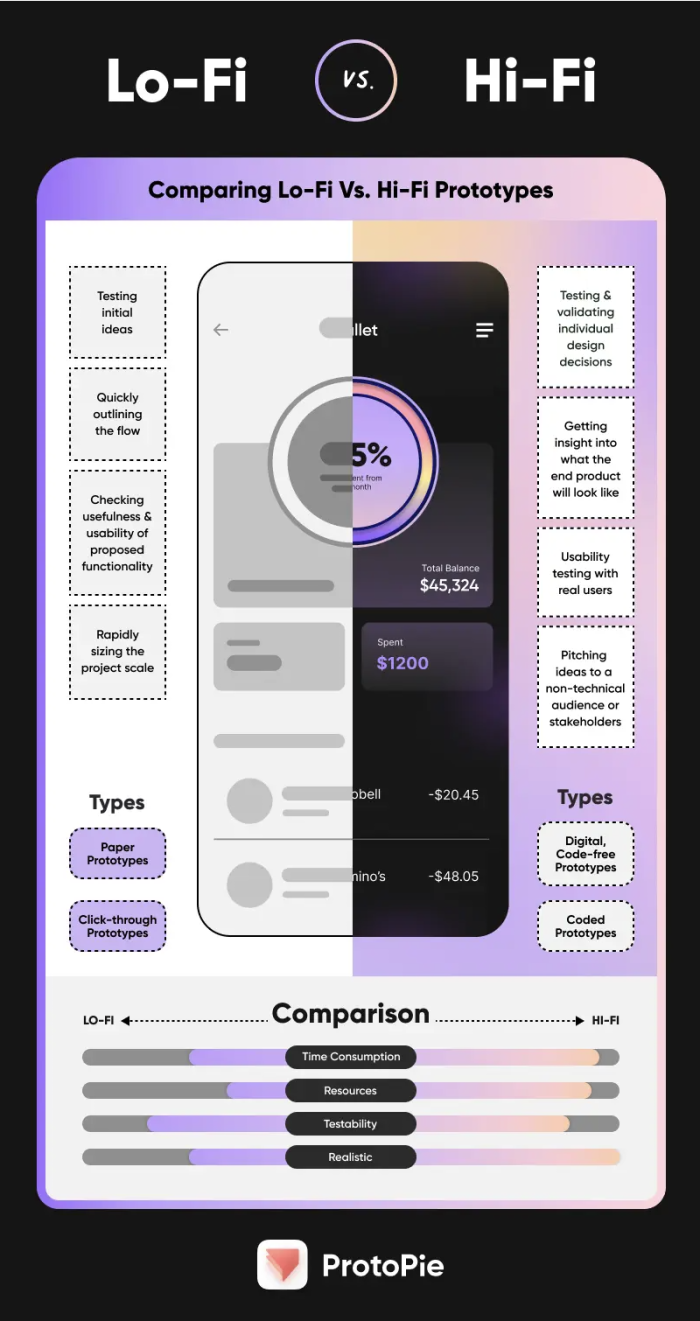
Once you’ve developed your prototype, it’s time to choose the usability testing technique that best supports your product discovery.
4. Choose the usability testing technique
Your usability testing technique is the approach you’ll take to gathering user feedback. There are a variety of user testing methods you want to consider:
Unmoderated vs. Moderated: In a moderated test—such as guerilla testing—someone from your team will be present to provide guidance and instructions during the test. In an unmoderated test—like open card sorting—the test participants will be given instructions and tasks to complete beforehand, and undergo the prototype testing on their own.
Remote vs. In-person: This one’s pretty self-explanatory. Remote usability testing is when the user and researcher are in different locations. In-person usability testing requires users to be present for the usability test, typically in an office, in a testing lab to minimize bias, or in a home environment to surround users with day-to-day distractions they’ll typically have around them.
Quantitative vs. Qualitative: Quantitative insights—such as those gathered from A/B testing—give you the numbers. For example, it could be the amount of time it takes users to complete a given task. Qualitative data—like 5-second tests—gives you verbal or written feedback, such as the comments users make when testing your prototype.
Usability tests can be a combination of the above methods—such as unmoderated remote tests or in-person qualitative tests, for example.
Matthieu De Tarlé from PickYourSkills describes what their prototype testing process looks like:
“There are always two people from our company attending the testing sessions: one who’s interacting with the tester asking questions and one who’s taking notes. All the sessions are recorded so that we’re able to rewatch them at any time.
At the beginning of the session, we usually take five minutes to give some context to the tester and tell them that there’s no good or bad answer to any question during our meeting.
Then, we ask them to complete an action on the prototype while thinking out loud. It allows us to understand their way of thinking without having to make any assumptions, which is really valuable. If the tester struggles to find the button they’re supposed to click, just ask them where they would have expected it to be.
Once all the testing sessions are done, we can rework the prototype and show it to new users if necessary.”
– Matthieu De Tarlé, Product Manager at PickYourSkills
Here, Matthieu describes a moderated approach that helps gather qualitative information directly from users.
However, if you’ve come up with a lot of assumptions but you don’t have enough information to move forward with confidence, you should test your assumptions first to help you prioritize what to validate next.
5. Decide which tools you’ll use
They say that a worker is only as good as their tools. The user testing tools you use can make or break your prototype testing.
You first need a tool that can help you develop your prototype. Low-fidelity prototypes can be drawn up by hand and implemented in paper form, but when it comes to high-fidelity prototypes you’ll need something a little more developed.
You’re looking for something that enables quick changes and updates to your prototype. Some examples of design prototyping tools include:
Figma: A collaborative tool for teams to design and build prototypes. It enables teams to bring a design from ideation to execution all in one place.
Chameleon can integrate with Figma to show your designs and prototypes inside your app with a button or media click. This is a great way to give users a preview of UI and UX changes or a sneak peek of upcoming features. Bonus points if you follow it up with a Chameleon Microsurvey for feedback!
Learn more about the Figma integration.
InVision: A prototyping tool that allows you to take your design mockups and turn them into interactive prototypes.
Marvel: A platform to design wireframes and prototypes that also enables you to test your designs.
Once you’ve got your prototype, you then want a tool that facilitates the testing process. Ideally, you’re looking for something that can help you uncover a wide variety of usability insights. Some examples of usability tools include:
Maze: A usability testing tool that allows you to test your product’s usability with a wide variety of testing methods, such as card sorting and 5-second tests.
Lookback: A user research tool that enables you to test your prototypes, betas, live apps, and websites to create real-time insights and understand what’s keeping your users from succeeding.
UXtweak: An all-in-one UX research platform that allows you to test your products and prototypes with a dedicated Prototype testing tool, as well as with Preference testing, Tree testing, and other tools.
These are some of the prototyping tools for UX/UI design and usability testing. Essentially, you’re looking to find a tool that not only helps you with the user testing process but also provides enough insights to inform your design. That way, you’re ready for the final stage of prototype testing: implementing feedback.
Tip: You can use Chameleon to gather contextual feedback with Microsurveys or run in-app messaging tests to validate new feature ideas before you put them into development. For example, fake-door testing can help you gauge interest in potential new features.
👉 Explore this interactive demo and see how to build a Chameleon Microsurvey to gather in-app feedback.
6. Evaluate the test results and implement changes
You’ve done it—you’ve successfully tested your prototype and gathered test results from users. This is likely a combination of quantitative and qualitative feedback from your research questions.
Now it’s time to implement feedback and make changes to your product. That doesn’t mean your prototype testing is over—just now you’ve got changes to make before sending your product for another round of testing.
These may be changes to the product itself or changes to specific features or functionalities depending on your prototyping format.
For example, if your users are finding the onboarding process confusing—you could consider adding Tooltips to help unblock users. If the user activation is causing issues, you could add an interactive widget to point them in the direction of useful resources. Here’s an example of what it can look like, built with a Chameleon Launcher.
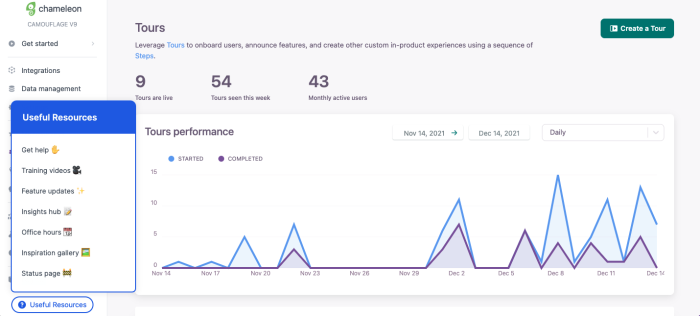
Your final product should be the result of numerous prototypes and ample usability testing. That way, you can validate your design and take it live.
Continuous testing means continuous improvement
Last but not least, keep testing.
Your design process shouldn’t be static—you always want to be improving. Prototype testing is a great way to gather feedback at different stages of product development.
Successful prototype testing is an iterative process—it’s a cycle of designing, testing, and implementing. You always want to be sure of the product decisions you’re making and testing prototypes is a great way to get feedback before your product or updates hit the market.
Plus, testing doesn’t have to cover every last product detail—getting feedback little and often is the key to great products. You want to consider your different options for prototype testing, and identify methods to follow up with the tester following the implementation of any changes. That way, you’re always learning and improving.
Wrapping up on key steps to prototype testing
Prototyping should be a go-to method for gathering insights for your design process—not just when you’re starting out, but throughout the entire product lifecycle.
Take these steps to ensure successful testing sessions and a solid decision-making process:
Know what you’re testing and why
Define the target audience for your test
Create a prototype
Choose the usability testing technique
Decide which tools you’ll use
Evaluate the test results and implement changes
All in all, creating and testing your prototype is only half the battle. You also need a quick and easy way to implement changes and create a better product experience for your users. The results of your prototype testing don’t always require a complete redesign or major changes—sometimes all it takes is streamlined guidance.


