What are user onboarding metrics?
User onboarding metrics are the quantifiable measurements used to assess the success of a product’s user onboarding. To understand the metrics, let’s define user onboarding as the system of actively guiding users to find new value in your product.
This user onboarding “system” can consist of:
Signup / account creation flow
“Getting Started” page with instructions in the product
Email sequences introducing the product and its key features.
Interactive in-app product tours / walkthroughs to guide users through key workflows
Help and support, via chat, calls, knowledge base etc.
While this is normally applied to brand new users to your product, it can also apply to new features or key changes for existing users. In those cases you are essentially onboarding users to a particular feature or change, instead of to the product overall.
Here are 8 of the most common user onboarding metrics:
Completion rate: Percentage of users who complete all the key steps in your onboarding flow.
Time to Value (TTV): Average duration for users to achieve a meaningful value (return) from using your product
Activation rate: Percentage of users who take a key activation action, like completing a profile or making a purchase.
Free-to-paid conversion rate: Measures the success of converting free trial users to paying customers.
Retention rate: Percentage of users who remain active after a certain timeframe (e.g., 30 days, 90 days).
User Satisfaction: Often assessed through surveys like NPS or CSAT, measuring users' feelings about their onboarding experience.
Ticket volume: Average number of support issues logged from new users prior to activation
Churn rate: Percentage of users who stop using your product within a specific period (monthly or yearly)
These can be classified into two key categories: “Leading” indicators and “Lagging” indicators.
Leading indicators predict future outcomes and provide a quicker way to measure the potential impact of changes or experiments. Lagging indicators measure past outcomes and are important to understand and validate the real impact of changes.
The most common objective of software businesses is to create long-term customers and continued product engagement over time is crucial to retaining customers. Therefore the ultimate measure of great user onboarding is Retention or Churn rate. Having a high retention rate and a low churn rate indicates users are happy with continuing to use and pay for your software. These are key “lagging” indicators.
However, waiting to assess retention (e.g. 90-day retention) means it requires that period of time before assessments can be made on the impact of any changes in user onboarding. Therefore "leading" indicators such as Completion rate, TTV, Activation rate, and free-to-paid conversion can be tracked.
If you cannot track these quantitative measures easily, you can also rely on semi-quantitative measures, such as number of tickets or user satisfaction rates. These are also leading indicators of success; if users respond positively to CSAT or NPS surveys or log a fewer number of support tickets, it’s reasonable to assume your user onboarding is succeeding.
Onboarding metrics like completion rate, time to value (TTV), and activation rate are early indicators of a user's engagement and the effectiveness of the onboarding process.
Long-term metrics such as retention and churn rates are crucial for assessing the lasting impact of onboarding efforts. A high retention rate indicates successful user adaptation and satisfaction.
Effective measurement of user onboarding metrics requires a granular breakdown of the user journey, from account creation to achieving "aha" moments. This enables precise tracking and optimization of each step.
Utilizing a combination of analytics tools, data warehouses, and customer feedback platforms enables comprehensive tracking, analysis, and improvement of user onboarding metrics.
As companies grow, the focus shifts from direct user interactions to leveraging data for scalable insights, necessitating a shift in onboarding strategies to include personalized experiences and data-driven decision-making.
How to implement and measure your user onboarding metrics
To effectively measure any metrics, the most fundamental aspect is to define the stages or steps in the user onboarding or activation journey.
For your product, you should identify in extremely high detail all the individual steps a user has to take throughout their new user journey. This should include, every:
Click (or other mouse action)
Input (or other keyboard action)
Content ingestion (reading, watching etc.)
Decision
You can lay this out as simple bullets or in a flow diagram (using a tool like Miro or Figjam) to provide the basic architecture for your tracking.
Once you have all these items listed, you should decide what the key stages are, for example, the moments a user:
Starts and completes sign-up (e.g. lands on the account creation page)
Starts and complete each stage of a setup process
Gets value for the first time (“aha” moments)
Takes actions that drive retention (e.g. inviting a colleague, or uploading some data etc.)
Takes actions around purchase (e.g. started trial, selected plan, completed payment etc.)
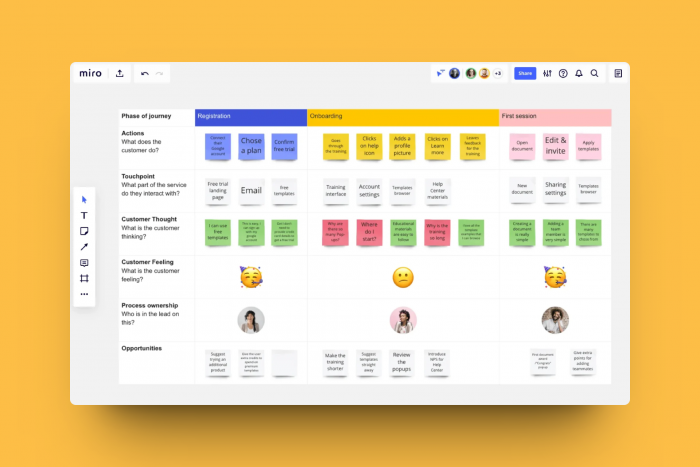
Customer Journey Map Template from Miro
There are two types of data you can collect on individual users:
Events: these are the “actions” that users undertake (e.g. Clicked Button) that can provide time-based milestones
Properties: these are attributes about the user (e.g. Role) that can enable categorization into groups based on their current status
The key difference is that properties hold a current “state” which can change over time as users engage in your product where events don’t change; instead more events are triggered as users engage.
For each of the key moments you should collect event data for the user, so you can construct a funnel showing drop-off, but in addition you may want to add properties that define the current “stage” the user is at. E.g. stage = “Signed-up”, “Started onboarding”, “Completed onboarding”, “Trialing”, “Activated”, “Paying”, “Engaged” etc.
This property can then help categorize your users and help you engage them accurately based on their stage.
Tools to help you track your user onboarding metrics
Your job to track and measure your user onboarding metrics will become a lot easier if you leverage the great SaaS tooling available for this. We can define the modern data stack across the following categories:
Instrumentation and data collection, including CDPs
Databases and warehouses for storage
Piping to move data between tools
BI and reporting tools
We’ll briefly describe these categories and some of the tools standard in each:
Instrumentation and data collection, including CDPs
You will collect your user data in two main places: inside your application (referred to as client-side or front-end) using typically Javascript APIs, or from the underlying engine of your product (referred to as server-side or back-end) using REST APIs.
Your engineering team will have to instrument these (see exception below) and can run this completely in-house or use APIs connected to certain tools, which then help show the tracking and send data to other places.
For example, Twilio Segment and Rudderstack both offer JS and REST APIs to collect your data. Once you have implemented the tracking using these APIs, then you will also be able to view and manage your data in these applications.
There are a couple of tools (e.g. Heap and Pendo) that also “Autotrack” your client-side data, automatically collecting all clicks and page load events, which you can then review anytime after these tools are first implemented. Even when using these tools, you likely will have to supplement with your own server-side tracking which will require engineering time. Sometimes these tools can also be brittle with the client-side tracking breaking when your page or application changes.
You may also want to consider leveraging a “tracking plan” — a clear schema which follows naming conventions for events, and helps ensure that everything is continuing to be tracked consistently. Tools that offer this include Amplitude and Ovo, although many tools will offer a glossary, or you can use a database system like Airtable.
In addition you should receive data around user engagement from tools used to communicate with users, that can also be piped into the same storage location, and to your BI and reporting tools, to supplement core product tracking.
For example, you can get data from the following tools, which will help paint a clearer picture of your users’ success across user onboarding:
Help desk and ticketing tools, e.g. Zendesk
Emailing solutions, e.g. Customer.io
In-app experiences products, e.g. Chameleon
You can review Chameleon's tracking system and data schema in Airtable here.
Databases and warehouses for storage
As you track all this data, you need somewhere reliable to store and access it. In the last 10 years, data warehouses (e.g., Snowflake, Databricks, Amazon Redshift, Google BigQuery, Microsoft Azure) have become the standard for storing all your historical data, providing significant advantages in accessing, moving, and transforming data over simply using databases.
Data warehouses typically integrate with many tools so that all your data can live in one place and are available for access from whichever system needs it for querying and analysis.
Piping to move data between tools
Now that the common stack includes a data warehouse, it’s important to be able to send the data from your tracking and other tools into the warehouse and access it from the various tools you need. This can be built in-house using the APIs of your warehousing solution, but companies also often use a piping tool that makes this easier.
Common tools for this include:
CDPs: Twilio Segment, Rudderstack
ETL tools (moving data from different systems into the warehouse): Fivetran, Airbyte
Reverse ETL tools (moving data from your warehouse to your BI/analysis or communication systems): Hightouch, Census
Get user onboarding data where you need it
Chameleon’s integrations with these data piping tools let you move in-app experiences data into your warehouse
BI and reporting tools
To help you analyze the data you’ve collected, you can use one of two categories of tools:
BI tools that plug into your database or warehouse and analyze the data contained there. These include: Microsoft Power BI, Google Looker, Salesforce Tableau, Domo, Mode.
Event analysis tools that ingest events and properties and allow you to easily create reports. These include: Amplitude, Mixpanel, Heap, Fullstory
Some tools (such as Fullstory, Heap, and Amplitude) also offer “Session Replay” functionality, which allows you to “watch” users taking actions in your app. The technology behind this collects data and reconstructs the user actions (so it’s not as data-heavy as video) and can provide additional user insights beyond event charts and dashboards.
User onboarding metrics and focus by company stage
What you measure and focus on depends on your stage of maturity; whether you’re early in optimizing your user onboarding flow or trying to use it as a lever to drive growth. Here are some recommendations based on your maturity stage:
User onboarding metrics for pre-PM Fit
At a pre-product Market Fit stage, the most important aspects of improving your user onboarding are discovery and qualitative research. You likely haven’t found the right flow and UX and have not been able to invest deeply in this area of the user journey.
Therefore, your approach to user onboarding should be “concierge” or “white glove,” where you spend as much time as possible watching, coaching, and questioning your users after they sign up for your product.
💡 Superhuman became an excellent case study in this... Learn more about Superhuman optimizing their PM-fit.
Instead of focusing on instrumenting events, you might prioritize using a Session Replay solution or live chat to be able to answer questions more quickly for users who are stuck.
User onboarding metrics for early Product Market Fit
If you have early signals of Product Market Fit (customers are paying and continuing to pay for your product, and possibly finding you via word of mouth as your customers advocate for your product) then you should start to focus on ensuring you’re able to measure and understand activation and conversion.
Set up your tracking, maybe with 10-15 events related to the new user journey, and create a few dashboards where you can track success, for example with Activation Rate, and Retention by new user cohort etc. These might be dashboards you check weekly or monthly to keep informed.
However most likely you’ll want to focus on making quick but large changes that can significantly impact success. It’s not about small optimizations at this stage yet; instead look for testing broadly different versions that might help you find a global maximum.
You should continue to talk to customers frequently and seek to gather qualitative feedback consistently to help you understand user sentiment. You may want to add a simple CSAT microsurvey asking users who activated, “How easy was it to get started on a scale of 1-10”. This could be a benchmark you then seek to improve.
User onboarding metrics for Growth or Scaling
Once you’re in Growth mode or looking to scale, you likely have many more customers and users than you can engage with, and you’ll have to use scale methods to collect feedback and analyze your user base. Here it’s important to have good instrumentation and access to data to measure the impact of your experiments.
Your work should focus on coming up with small, high-ROI experiments that you can ship quickly to understand the impact. Smaller improvements to your activation rate (2-10%) will be considered successful.
In addition you may have a big enough user base that it contains multiple personas or use cases. Therefore, personalization will become important to improve your overall success rate. You should ensure you ask qualifying questions as part of the signup or new user flow and feed this data back into your data system, so you can cut and cohort your data by these personas to better understand the user onboarding metrics for each persona.
User onboarding metrics for Maturity
Once you’re at maturity as a company (think public company or 1k+ employees), then you are likely to be a critical application for many important customers and are seeking smaller incremental improvements to your user onboarding. You may be running many concurrent experiments or have a team dedicated to improving this aspect of the user journey.
A new consideration will be “efficiency”—how much investment is required to help onboard new users, especially regarding the customer support or success resources needed. Therefore, you may be focussed on reducing the number of support tickets or may want to incorporate more self-serve resources for smaller customers with lower LTV for your company.
You may be focused on maintaining current activation rates while reducing/removing human interventions, or you may be looking at activation rates for different products or cross-activation to help expand the average revenue per customer or NRR.
You may also have access to data science and consider modeling the downstream impact of changes in different metrics. For example, what is the overall retention rate if more users activate feature X vs. feature Y? This can help you prioritize where to invest your time.
There’s a good description of how Duolingo did this in this Lenny’s Newsletter article.
Benchmarks for user onboarding metrics
How to use these benchmarks correctly
Benchmarks can be distracting and unhelpful but they can be valuable to review in the following scenarios:
Understanding the status quo before building. For example, before you launch a new product, you might want to understand what the normal levels for activation or retention might be
Identifying opportunities for focus. When broadly considering which part of the funnel to focus on or which metric might drive the greatest business value, you can compare benchmarks with your current metrics (e.g. how much potential improvement is available for activation vs. retention)
Evaluating targets for a specific project. If you’re undertaking a new project (e.g. revamping your user onboarding) you may want to use relevant benchmarks to set your goals for the project
Whenever using benchmarks there are some important considerations that can decide whether they are a source of signal or noise:
Do they match your context? The more specific to your use case, audience, industry, time period etc. you can get the better
How reliable are they? Are they from a statistically significant data source or from across a sufficiently large sample size? Be wary of hearing only half the story
Even when using benchmarks, you have to continue to measure the long-term and downstream impact of any user onboarding metrics for your business. It might be great to improve activation, but that should ultimately lead to more (efficient) revenue for your company.
We discussed best practices when using benchmarks with PLG guru Kyle Poyar, Partner at OpenView and Ibrahim Bashir, VP Product at Amplitude. Check out this short video where they share their experience and perspectives:
Activation Rate Benchmarks
While the definition of “Activation” will vary based on company, we hope that most companies are sensible and do not use something as basic as “email authentication” but something that truly provides value to the user.
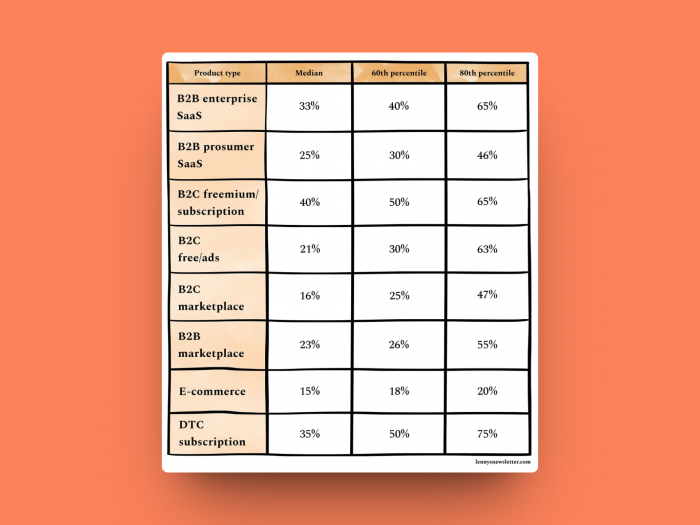
Lenny compiled the activation rates across many companies here and this can be a good starting point for understanding where your product stands:
To help you model the impact of improving your Activation metric, you can consider the following approach:
Benchmark your existing activation rate
Link activation metric to customer lifetime value (e.g. does increasing activation lead to reducing churn, therefore increasing lifetime… or does increasing activation increase the average revenue per user etc.)
Calculate the increase in LTV per month you can achieve by increasing your activation metric from your current to the benchmark
Many of Chameleon’s customers leverage in-app experiences such as checklists, onboarding tours, embedded cards etc. to improve their activation rate.
Chameleon’s User Onboarding Benchmarks
In-app experiences are a common and critical part of the user onboarding system and evaluating the success of these is a valuable component to improving your user onboarding metrics and quickly assessing the potential impact on activation rate.
Chameleon’s hundreds of customers have built thousands of in-app experiences, served to millions of users, so each year we use billions of data points to uncover insights on what works for product tours, modal announcements, walkthroughs, checklists etc.
5 best practices for improving your user onboarding metrics
Improving your user onboarding metrics can be hard; most experiments may return no statistically significant results or the alternative might only show incremental improvement. The key is to continue experimenting, especially broadly and quickly, to help you find patterns and interactions that help move the needle.
Nevertheless these high-level principles can be a good starting point to reconsider your user onboarding and identify opportunities to experiment or change.
1. Keep friction to whatever is necessary
Friction in the product is the force that prevents a user moving forward; this comes from decision points, dead-ends, reading/learning, and inputs.
Many product teams become desensitized to the friction in their flows, so we highly recommend conducting a friction-log exercise to help identify key points of friction and the emotional impact this can have on users.
You should/could experiment with significantly reducing friction and assessing the impact on your user onboarding metrics. Note that while it might improve conversion, you should test long-term / lagging metrics like retention also.
2. Ensure you give users options to choose
Likely your users have widely different intentions and objectives when first entering your product; a common parting is between those who are casually browsing (“tyre-kicking”) and those with strong motivation to evaluate.
Some of these intentions can be hard to assess early, and so pushing one user onboarding flow or set of directions/guidance to all users can be counter-productive, especially for users it isn’t a good fit.
Therefore you can experiment with letting users choose their flavor of user onboarding, guidance, or steps.
3. Reduce interruptions
Interruptions can be a source of annoyance and increase the friction for new users. Whilst welcome tours may have the best of intentions, it can be hard to predict when they are relevant and desired.
You can let users choose to start a welcome tour from an onboarding checklist, or an embedded card, so you’re giving them choice, but also not interrupting their flow.
As part of your product’s component library or design system, you can outline the patterns that will be used, and ensure any interruptive patterns (like modals) are used only in the most critical, important, or valuable situations.
4. Personalize based on intent and use case
If you are able to learn your users’ intent or use cases (e.g. by leveraging questions during the sign-up flow or using microsurveys soon afterwards) then you can provide a tailored user onboarding UX.
If you’re able to feed in data about the user pre-sign-up (with identity resolution of anonymous users, and via reverse ETL sync between your warehouse and your user onboarding tool) then you can target users based on their source of acquisition or marketing campaign/channel.
One simple way to do this without a lot of tooling/data is: ask users about their main use case via a microsurvey and then show the most relevant onboarding checklist based on their response. You can do this with Chameleon!
5. Experiment quickly
Whatever tactical choices you make or patterns you use, it’s key to have a full pipeline of experiment ideas and attempt to move quickly.
A no-/low-code solution should be able to help you here, and then, if necessary, you can build any successful patterns into your product as first-party components.
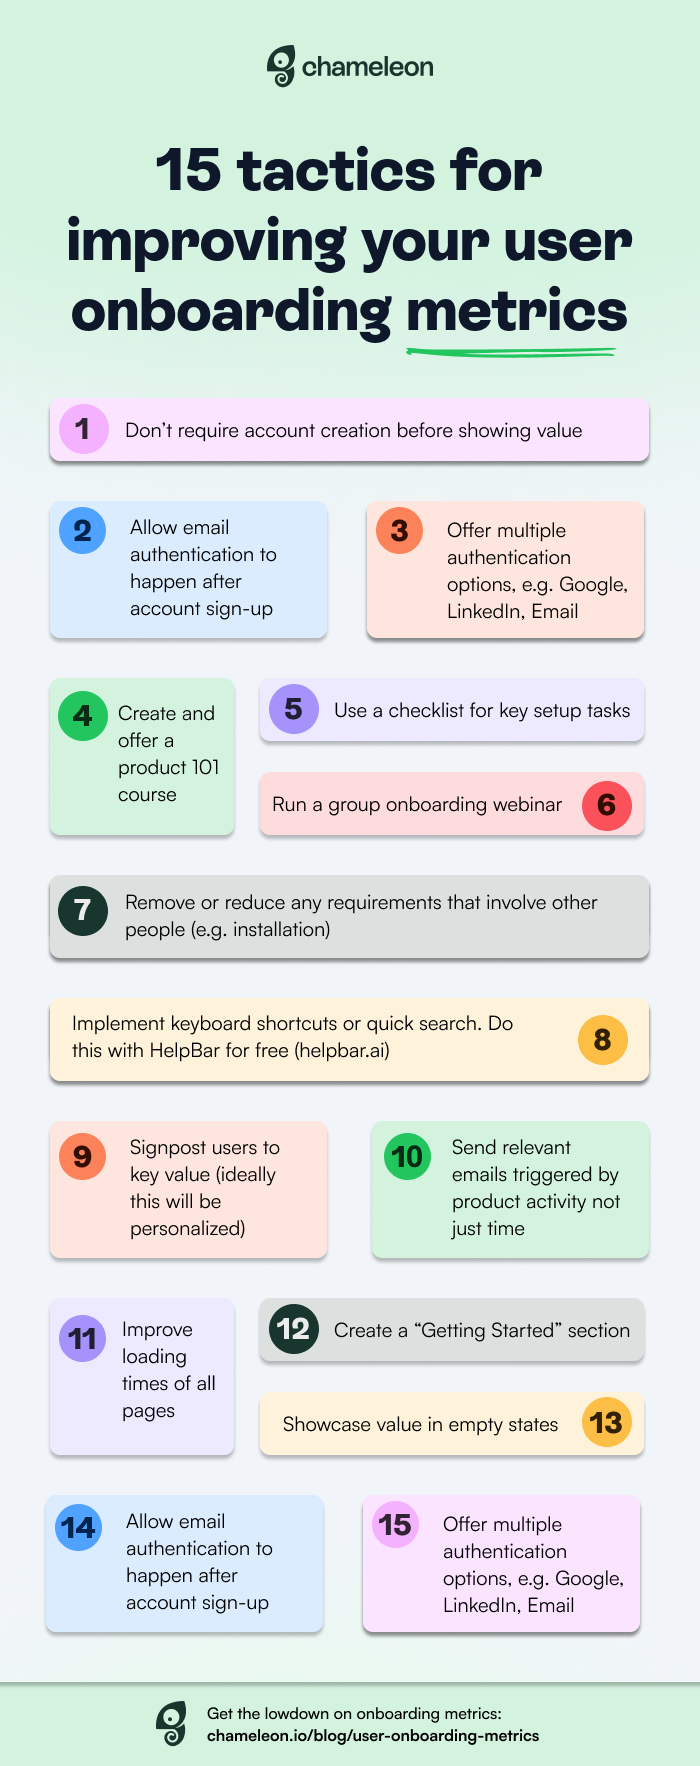
15 tactics for improving your user onboarding metrics
In case you’re looking for some specific inspiration on what to change, try one of the ideas below:
Don’t require account creation before showing value
Allow email authentication to happen after account sign-up
Offer multiple authentication options (e.g. Google, Microsoft, LinkedIn, email etc.)
Have a clear “Getting Started” section / page
Use a checklist for key setup tasks
Signpost users to key value (ideally personalized)
Use smart defaults on any choices that need to be made
Remove/reduce requirements that involve other people (e.g. installation)
Make help resources clearly available via self-service
Create and offer a 101 course for your product
Run an onboarding webinar and invite users to join
Improve loading times of all pages/screens/views
Showcase value in empty states (e.g. CTAs that open videos in-app)
Send relevant emails triggered by product activity (not time)
Implement keyboard shortcuts or quick search (do this with HelpBar for free)
